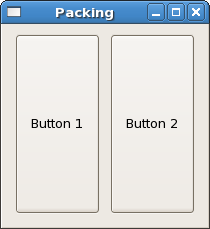
When creating an application, you'll want to put more than one widget inside a
window. Our first "hello world" example only used one widget so we could simply
use set to specify a containerChild widget for
window, or use containerAdd to "pack" the widget into
the window. But when you want to put more than one widget into a window, how do
you control where that widget is positioned? This is where packing comes in.
Most packing is done by creating boxes. These are invisible widget containers that we can pack our widgets into which come in two forms: a horizontal box and a vertical box. When packing widgets into a horizontal box, the objects are inserted horizontally from left to right or right to left depending on the call used. In a vertical box, widgets are packed from top to bottom or vice versa. You may use any combination of boxes inside or beside other boxes to create the desired effect.
To create a new horizontal box, we use hBoxNew, and for vertical
boxes, vBoxNew. Both take a Bool and an
Int parameter. The first parameter will give all children equal
space allotments if set to True and the second sets the number of
pixels to place by default between the children.
The boxPackStart and boxPackEnd functions are used to
place objects inside of these containers. The boxPackStart
function will start at the top and work its way down in a VBox,
and pack left to right in an HBox. boxPackEnd will do
the opposite, packing from bottom to top in a VBox, and right to
left in an HBox. Using these functions allows us to right justify
or left justify our widgets and they may be mixed in any way to achieve the
desired effect. We will use boxPackStart in most of our examples.
An object may be another container or a widget. In fact, many widgets are
actually containers themselves—including button, but we
usually only use a label inside a button.

import Graphics.UI.Gtk

main :: IO ()
main = do
  initGUI
  window  <- windowNew
  hbox    <- hBoxNew True 10
  button1 <- buttonNewWithLabel "Button 1"
  button2 <- buttonNewWithLabel "Button 2"
  set window [windowDefaultWidth := 200, windowDefaultHeight := 200,
              containerBorderWidth := 10, containerChild := hbox]
  boxPackStart hbox button1 PackGrow 0
  boxPackStart hbox button2 PackGrow 0
  onDestroy window mainQuit
  widgetShowAll window
  mainGUI
By using boxPackStart or boxPackEnd, GTK knows where
you want to place your widgets so it can do automatic resizing and other nifty
things.
boxPackStart :: (WidgetClass child, BoxClass self) => self -> child -> Packing -> Int -> IO ()
boxPackEnd :: (WidgetClass child, BoxClass self) => self -> child -> Packing -> Int -> IO ()
The Packing parameter specifies the way the widgets in the
container behave when the window is resized. PackNatural means the
widgets will retain their size and stay where they are, PackGrow
means they will be resized, and using PackRepel the widgets will
be padded equally on both sides. The last parameter is an Int,
which specifies any extra padding to be put between this child and its
neighbours.
Note that the packing only applies to the dimension of the box. If, for
example, you specify PackNatural instead of PackGrow
in the above, resizing horizontally will keep the buttons at their original
size, but resizing vertically will also resize the buttons. This is because the
buttons are placed homogeneously in the horizontal box (the first parameter is
True) and the box itself will resize with the window. The next
example will make the effects more clear.